Alessandro Pistilli Blog

May 23, 2020

Ciambelline al vino, delicacy from Ciociaria – Alessandro Pistilli

Filed under: Food,Mom's Notebook — Tags: , , — alessandro @ 12:00 am

Ciambelline al vino, delicacy from Ciociaria

This is the original page from my mom's notebook

Ciambelline al vino (drunken donuts in English) are a typical delicacy of my land, Ciociaria (Lazio, Italy). Similar recipes, with their own twist, can be found across all Italy.

I remember my mom making Ciambelline regularly and how much I loved them as kid, but also as adult!
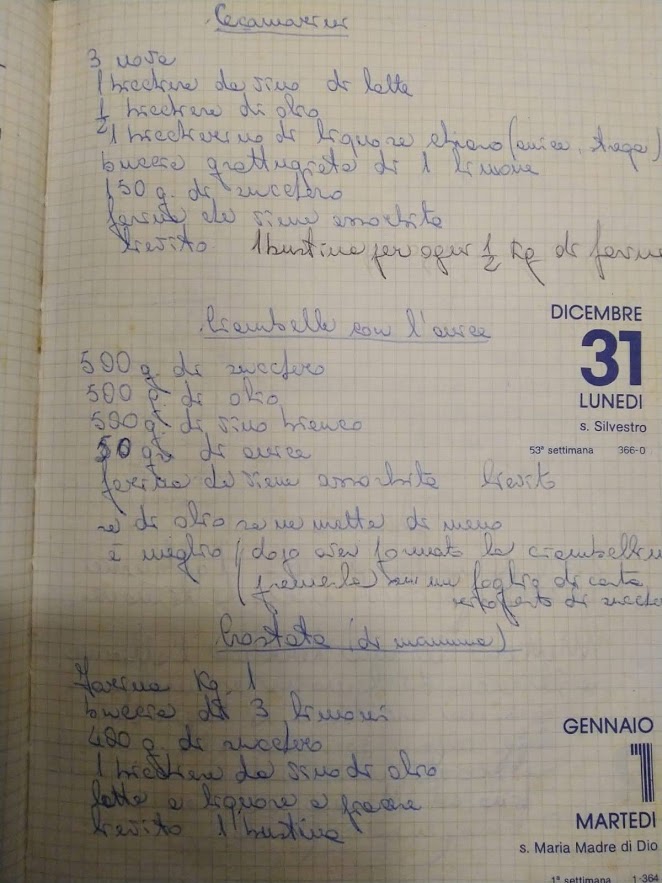
I found the recipe in her notebook and spoke to her to figure out the preparation, I also consulted another local blogs.

In this recipe all ingredients are measured by “glass” . Our parents used to do things by “eye” and adjust as needed. They didn’t use fancy appliances as we do now.

Pick a small glass in your home and use it as your “measurement”. I use small wine glasses that hold at least 150ml of water. You pick your own and adjust as needed.
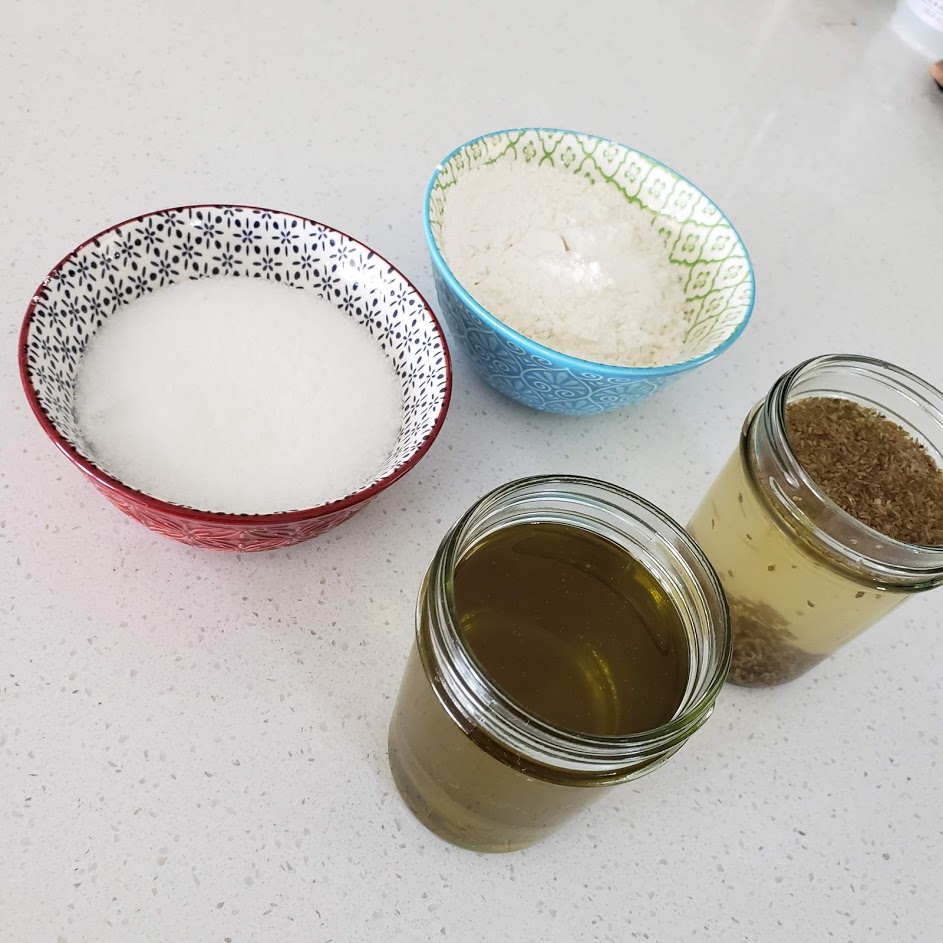

Ingredients

– 1 glass of extra virgin olive oil
– 1 glass of white wine
– 1 glass of sugar
– 1 tbsp. anise seeds
– 1/2 tbsp. baking soda
– Flour (3-4 glasses*)

*Flour must be added to bring the dough to the right consistency, so it will depends on the flour type.


Instructions

Start by soaking the anise seeds in the wine for about 30 minutes. Then combine all the ingredients except the flour in a bowl. Mix them well to make sure the sugar dissolves.
Now add one glass of flour and mix, then add another one. The dough will still be runny but now it’s time to start paying attention. As you add more flour, your dough will start to thicken, until it reaches the right moisture and consistency. Something that is not too sticky and you can work with your hands. I used the kitchenAid to work the dough, but a spoon and your hands should be fine as well

When your dough has reached the right consistency, you’re ready to prepare your donuts by hand.
Turn on your oven at 350F, prepare a couple of trays with parchment paper and complete your your “rolling station” with a plate filled with sugar!
This is how you roll:
– Take a small piece of dough from the bowl
– Roll it on a wooden surface (but any surface should work)
– When you have a tiny string of dough (about 1cm), fold it in a donut
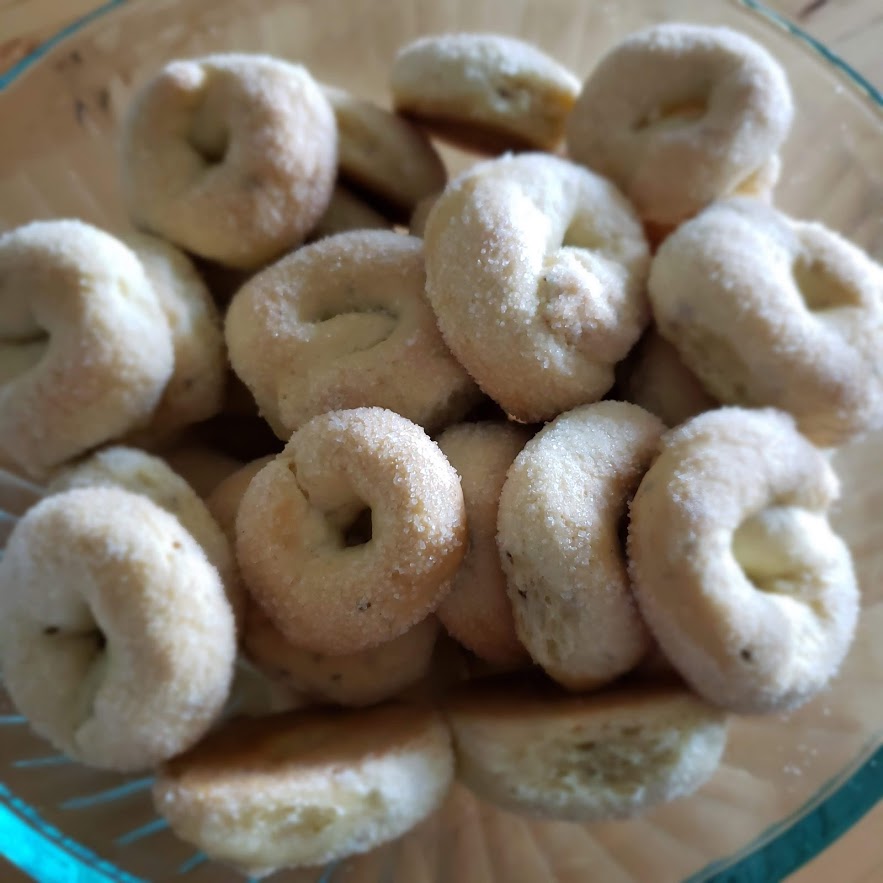
– Now pass both sides of the donut into the sugar and place it on the tray

When you’ve worked all your dough, you’re ready to bake!
Mine took about 35 minutes to be ready. After 15m I rotated the trays for uniform cooking.

Let your donuts cool for about 30 minutes and they are ready for tasting!
You can keep them in an airtight container for weeks.

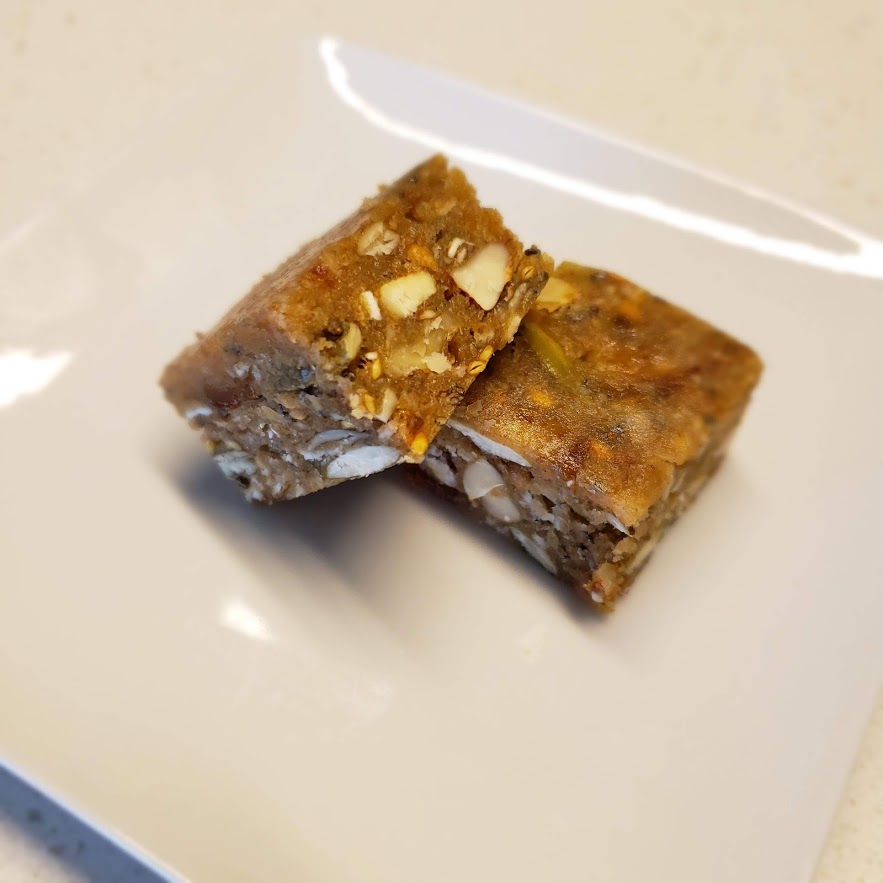
As you can see from the pictures, the Ciambelline were outstanding and delicious! Give this recipe a try!

    Leave a Reply

    Your email address will not be published. Required fields are marked *

    This site uses Akismet to reduce spam. Learn how your comment data is processed.

    May 17, 2020

    Healthy and sugar free protein bars – Alessandro Pistilli

    Filed under: Food — Tags: — alessandro @ 12:00 am

    Healthy and sugar free protein bars

    It’s always struggle to find nutritious food to snack or to bring at work. My favorite is an healthy protein bar because it’s easy to carry and eat. I always wanted to do my own.
    I tried many recipes, but couldn’t find one that was good, easy and consistent.
    After a few attempts, I found a great recipe for sugar free and healthy protein bars.
    I made some adjustments based on personal to speed up the process.
    This recipe churns enough bars for a week, so you can do it over the weekend and enjoy it for the whole week.
    Let’s go!

    Ingredients for delicious energy bars

    Ingredients

    • 100 gr Rolled oat
    • 100 gr Walnuts
    • 100 gr Almonds
    • 100 gr Cashew
    • 10 Dates, pitted and soaked in hot water
    • 50 gr Pumpkin seeds
    • 2 tbsp. Chia seeds
    • 2 tbsp. Flax seeds

    You need a food processor to powder the nuts. I use a Vitamix, but any food processor is fine.

    Instructions
    Put all the nuts (except a handful) and the oat into a food processor. Pulse until they are reduced to a powder.
    This is the base for your bars.
    Separately, chop the nuts that you previously set apart. This will give your bars a delicious texture and crunchiness.
    Check below the size and consistency of my chunks and poweder.

    Now process the dates and reduce them to a paste.
    Combine it with the powdered and chunky nuts and add all the seeds (chia, flax and pumpkin).
    Mix all the ingredients until they are well combined. If the mix feels wet, add more oat, one tablespoon at time.
    The mixture must feel not too sticky or you’ll have hard time making the bars.

    Transfer the mixture on a tray, covered with parchment paper. Flatten the mixture and use an extra parchment paper sheet to press it well.
    Put it in the fridge for about an hour to settle. Then take it out and you’re ready to cut the bars.

    Cut the bars in the size you like. I prefer mine in 1 inch squares.
    Store the bars in a airtight container. If stored correctly, they last 2-3 weeks.

    Try them and let me know!

      Leave a Reply

      Your email address will not be published. Required fields are marked *

      This site uses Akismet to reduce spam. Learn how your comment data is processed.

      May 6, 2020

      Easy Italian Bread recipe – Alessandro Pistilli

      Filed under: Food — Tags: , , , — alessandro @ 12:00 am

      Easy Italian Bread recipe

      I’ve been searching for a good recipe to make easy Italian bread at home. I found it!
      This recipe is a slam dunk! It’s the easiest way to make foolproof Italian bread with very little effort! All you need is 5 ingredients and a Dutch oven! I promise, you won’t be disappointed.
      Let’s get started!

      Ingredients for our Italian bread recipe

      Ingredients
      – 400 gr of Flour
      – 300 ml water
      – 2 gr Yeast
      – 1 Tsp salt
      – 1/2 Tsp sugar


      Instructions

      First, put the dry ingredients into a medium bowl, mix them together. Then, add water and until all ingredients blend together nicely.

      Now seal the bowl with its lid or with a plastic wrap and let it rest for 15 minutes.
      Then, mix the dough again inside the bowl with your hands or with a spatula.
      Let it rest again for 15 minutes, then mix one more last time.

      This is how the dough should look, after mixing the ingredients

      The dough should look like this.
      Now, leave your bowl in your fridge sealed for 12 to 24 hours. I like to do my dough in the evening, so I can let it rest overnight.

      This is the time needed by the yeast to do its magic. The longer it takes, the lighter your bread will be!
      After 12-24 hours, take your dough off the fridge: it’s time to work it with your hands, time to get dirty!
      You can check my technique in the video below.

      Make sure to use a well floured cloth or your dough might get stuck

      You’ve worked the dough like in the video. Flatten it on a surface, fold it a couple of times and turn it into a ball. This is the most important part of the process. The structure of your bread depends on this work!
      Once done, place your dough, gently, in a bowl covered with a cloth that has been generously sprinkled with flour. The flour will prevent the dough to stick to the cloth.
      Cover the dough with the cloth and let it rest and rise for about 90 minutes.

      Let your dough rises and set your oven at 450F let it warm with your Dutch oven inside.
      After the 90 minutes have passed, gently place your dough into the Dutch Oven, cover it and put it back in the oven.
      Let it cook for 30 minutes.
      Now remove the lid and let it cook for 20 more minutes at 430F.
      Your bread is now ready to go. Take it off the Dutch oven and let it cool for about 20/30 minutes.

      It should look something like this

      Let your loaf cool for 20-30 minutes and you’re ready to cut it and taste it.
      Enjoy!

        Leave a Reply

        Your email address will not be published.

        This site uses Akismet to reduce spam. Learn how your comment data is processed.

        February 21, 2016

        My take on Avocado Ice cream – Alessandro Pistilli

        Filed under: Food — alessandro @ 12:00 am

        My take on Avocado Ice cream

        I haven’t posted in ages. Food is bringing me back…
        As way of background, I blogged about New York City at first, about tech and food.

        I love food: eating it as well as cooking it.

        Today I made Vegan avocado lime ice cream, Recipe courtesy found on Serious Eats!

        I won’t go through the recipe into details, as you can find it in the link above.
        Also, preparation is quite simple.
        Put avocado, sugar, water, lime zest and juice in a blender and blend until smooth.
        Refrigerate the mixture for a few hours, until very cold.
        Then churn it in your ice cream maker. I use the Kitchen Aid ice cream maker attachment!
        Transfer it to an airtight container and chill for a few hours, until firm.

        Scoop into a bowl, and enjoy it!

        One Comment

        Leave a Reply

        Your email address will not be published.

        This site uses Akismet to reduce spam. Learn how your comment data is processed.

        March 14, 2010

        Linguine with lobster – Alessandro Pistilli

        Filed under: Food,pics — Tags: — alessandro @ 12:00 am
          Leave a Reply

          Your email address will not be published.

          This site uses Akismet to reduce spam. Learn how your comment data is processed.

          January 6, 2010

          Food: Linguine with Mushrooms – Alessandro Pistilli

          Filed under: Food,pics — Tags: , — alessandro @ 12:00 am
            Leave a Reply

            Your email address will not be published. Required fields are marked *

            This site uses Akismet to reduce spam. Learn how your comment data is processed.

            January 2, 2010

            Food: back to basic – Alessandro Pistilli

            Filed under: Food,pics — alessandro @ 12:00 am
              Leave a Reply

              Your email address will not be published. Required fields are marked *

              This site uses Akismet to reduce spam. Learn how your comment data is processed.

              April 8, 2009

              Make it, eat it! – Alessandro Pistilli

              Filed under: Food,miscellanea,pics — Tags: , , — alessandro @ 12:00 am

              Make it, eat it!

              I’m in love with food… you know….coming back home and decompress preparing something delicious and tasty is priceless….

              My last creation: I worked on a seafood salad and a korean strawberry macedonia … Simply priceless!

              Take a look…soon the recipes!

                Leave a Reply

                Your email address will not be published. Required fields are marked *

                This site uses Akismet to reduce spam. Learn how your comment data is processed.

                February 14, 2009

                My hand made pesto – Alessandro Pistilli

                Filed under: Food — Tags: , , — alessandro @ 12:00 am

                My hand made pesto

                Forget blender and mixer if you’re serious about pesto!

                What you need is a mortar, a lot of patience, and a little bit of strenght!

                I’m not good with quantity but that’s my way:

                – fill the mortar with packed basil leaves (dry).

                – Add 1 garlic

                – Add some salt

                Start working with the mortar untill the basil and the garlic are perfectly chopped and melted together.

                At this point add the some pine nuts (pinoli) and keep working with the mortar.

                When the pine nuts are melted with the pesto add oil, parmigiano and pecorino cheese.

                Fix the flavor with salt and pepper.

                To get an idea of the ingredients proportions have a look at this recipe

                That’s it!

                One Comment

                Leave a Reply

                Your email address will not be published. Required fields are marked *

                This site uses Akismet to reduce spam. Learn how your comment data is processed.

                May 19, 2006

                Brian Park Salad – Alessandro Pistilli

                Filed under: Food,Italian,NYC — alessandro @ 12:00 am

                Brian Park Salad

                A New York c’è un posto chiamato Bryant Park.
                E’ una specie di luogo di culto,
                dove la gente va a trascorrere  momenti piacevoli mangiando,
                leggendo, giocando a scacchi o semplicemente cazzeggiando.
                Il parco ha regole molto ferree ma offre anche moltissime possibilità di svago e relax:
                – Libri gratis
                – Scacchiere gratis
                – Sedie, tavoli e panchine gratis
                – Connessione wi-fi offerta da google.
                Non male no??

                Il tutto situato nel retro della enorme biblioteca comunale!
                Questo posto ce lo fa scoprire Max

                bp_salad
                Ed è un’esperienza da provare.
                Immagina una pausa pranzo.
                Immagina un deli soup.
                Immagina infiniti ingredienti da scegliere.
                Immagina condimenti sconosciuti.

                Inventa la tua insalata, mixa il tutto, condiscila con quel che ti pare,
                ma con audacia.

                Trova un posto tra le centinaia di sedie e tavoli del parco.
                Siediti, togliti le scarpe, e mangia.

                Bevi la tua birra/coca, fuma la tua sigaretta.

                Per i ringraziamenti puoi passare alla cassa:-)

                  Leave a Reply

                  Your email address will not be published.

                  This site uses Akismet to reduce spam. Learn how your comment data is processed.

                  Powered by WordPress